Pages

Thursday, December 22, 2011

Yarn-Wrapped Monogram (crochet version)

Oh, Pinterest, how I love you and your plethora of ideas.  I finally joined after I turned in my last final (my bribe for focusing one last time on schoolwork!) and it's been hours of idea-gathering.  As you can see from the number of recent blog posts I've had some extra time on my hands and I've apparently been making up for lost time by trying out all these new ideas.  In this post I'll share with you how I tweaked the yarn-wrapped letters I saw here. 

Yarn-wrapped letters are nothing new.  I first noticed them in Austin when I walked down South Congress (my favorite part of the city!).  There's a cute little coffee shack called Jo's--clever, I know-- that has letters on their sign wrapped in sweaters!

I bought a paper-mache letter A at Joann's and started to wrap it in yarn until I got the idea to go one better.  Inspired by the sign in Austin I decided to make a crocheted monogram.  You'll need these supplies plus a hot glue gun:


That's a huge amount of crocheted chain.  You'll need a lot before you get started.  I guess the easiest way to walk you through this is to let my pictures do the talking.  Just remember to glue where you need to and make one side the "pretty side."  Also, don't forget about the top, bottom, and the weird nooks and crannies specific to your monogram.


(Hey!  These two are a very important part of the crafting process!)


The finished product!  The light spots aren't so bold in person but I like that they provide some contrast so you can see through the stitches that this is crocheted.

Tuesday, December 20, 2011

Super Mario Mushroom Cupcakes

No, those aren't "Super Mario Mushroom-Flavored Cupcakes" (thank goodness!).  I made these for the birthday celebration of Adam's best friend Devlin.  Devlin turned 30 today and decided to celebrate by going back to his gaming roots.  His quest took him from the original Nintendo through Super Nintendo up through Sega Genesis, which is where he's currently playing before he moves a little further into the 1990's.  As he played this morning he mentioned to his wife, Laura, that it would be cool to have cupcakes that looked like the little mushroom in the Mario series.  She passed this idea along to me and the mushroom cupcakes were started.


To be fair, I Googled "Mario Mushroom Cupcake" to get an idea of how to proceed and got some good visual aids.  I wanted to make both the red and green mushrooms (since the 1-Up mushroom is the greatest of them all) and could have *sworn* I'd seen green and red tubs of frosting in the stores in the Christmas baking displays.  I have the hardest time coloring icing to be really dark, bold colors and wanted to cheat with something that was already colored for me, especially with my time crunch.  Instead I found cherry-flavored icing (pink) and Christmas sprinkle icing (light green) so I made those darker instead of starting from scratch.  I used a boxed mix that appeared to be really nice but instead turned out really flat.  The cupcakes were probably the lightest and fluffiest I've made but I really needed something that would puff up!  Eh, at least they tasted good and looked cute.


Their eyes are made from chocolate squares that I melted down and piped on.  The white circles on top are Wilton's candy melts (in their unmelted form), which just so happened to be part of a recent Christmas gift from Garrett and Amanda (thanks guys!).  After packing up the cupcakes (and maybe sampling a little along the way) I saved one to put in another of my Christmas gifts:  a single-serving cupcake display from one of my coworkers, Amanda.  So pretty and whimsical all in one!
We're still waiting to see if anything happens if you eat the cupcakes.  If I see anyone gain an extra life or suddenly double in size I'll let you know.

Adi

Thursday, December 15, 2011

Sausage Bread

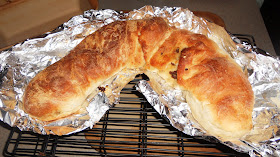
What starts like this


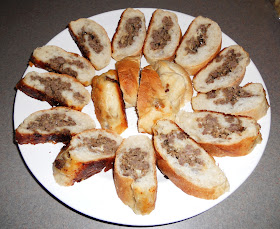
 and ends up like this?


Sausage Bread!

I needed a dish for our department Christmas party today.  I also needed to make some room in my freezer.  Figuring everyone would jump on "desserts" and "sides" I signed up under the "bread" category.  It's a pretty simple bread since the good folks at Bridgeford do all the hard work.  Add this recipe to your file and pull it out if you have a day's notice that you need to bring some bread to some event.  It also makes a delicious breakfast when you heat up a slice!

Sausage Bread
-1 package of Bridgeford frozen bread (or any equivalent that is about 9-12 inches long)
-1 package of ground sausage
-1 cup of Parmesan cheese

Follow package directions for thawing the bread loaf (just one of them).  Once it's thawed you'll need to let it rise (3-6 hours according to the package).  When the bread is nice and expanded preheat the oven to 350 degrees.  Cook the sausage on the stovetop until done.  Drain any grease.  Take a cookie sheet and line it with foil that has been sprayed with cooking spray (Pam).  Put your bread loaf on the pan and flatten it out until it makes a long rectangle.  Pour the ground sausage down the middle of the rectangle, and repeat with the cheese.  Using water to seal the edges, fold one side of the rectangle over to the other side, trapping the meat and cheese in the bread "tube."  (I think it helps to twist and tuck it under, essentially flipping the entire thing over so nothing falls out.)  It kinda stretches as you do this so it starts to make a "U" shape.  Bake at 350 degrees for 30ish minutes and try not to eat it, even though you may really want some.

Enjoy!

Monday, December 5, 2011

One of my favorite Christmas traditions

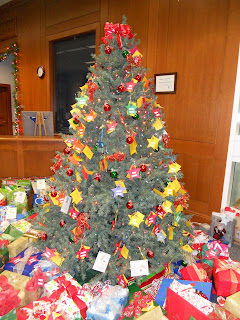
Every year I like to grab a few stars off of the Meals on Wheels tree at Texas Wesleyan. 

Local seniors get to request things like mittens, calendars, and even food for their dogs.  When we were on campus a few weeks ago taking graduation pictures Kayla and I stopped by the tree so I could choose this year's adoptees.  I chose one who wanted a magnifying glass and another who wanted socks.  Then Kayla spotted the perfect one and handed it to me:  a lady named Adrienne wanted a scarf.  Since she had such as awesome name I made her one myself.

If you're ever over in the neighborhood of TWU at Christmas you should participate in this great program.  You can also check your local senior center or retirement home--they tend to have trees like this, too.  While it's always a good time to help someone in need, you may just be able to give someone the only Christmas gift they'll receive this year.

Love,
Adi

Thursday, November 24, 2011

Happy Turkey Day!

Happy Turkey Day!  Nothing says Thanksgiving like turkey cookies, right?  (As I had to explain to my classmates:  they're turkey-shaped, not turkey-flavored!) 

We had an afternoon full of family and food.  I was responsible for cranberry sauce and green bean casserole (with the cookies thrown in).  I used the cranberry sauce recipe Granny Rae gave me last year and took the green bean casserole recipe from a magazine. 

I'd definitely add twice as many green beans next time.  The recipe called for "8 cups."  I guess I was supposed to mash them down and pack in as many green beans as I could into those 8 cups?  Eh, at least they tasted good.


My mouth is watering looking back at these pictures, and I didn't even bring the pies!
I hope you had a great Thanksgiving with family and friends.  I'm thankful for all of mine, that's for sure!


Thursday, November 17, 2011

Pho real

Jazzed by the thought of the upcoming weekend and coming off a relatively quiet week I made this a "make a mess in the kitchen" kind of night.  There's a pie contest at work tomorrow so I had to make a pie for that.  Don't get your hopes up, I'm not a pie person so I'm not counting on placing.  In fact, I scrapped the first pie because my crust was so hideously misshaped.  I don't like regular crust anyway.  I cheated and used a store-bought graham cracker crust and switched from a chocolate chip pie (which would require baking at the same time as the shell, and as I mentioned that wasn't gonna happen tonight) to a banana cream pie.  I'd show a pic but it's not finished yet--whipped cream happens tomorrow morning.  I will point out that it's the first time I've made a cream pie without scrambling the eggs!  See, I'm making pie progress.

The real star of the show tonight was pho.  The HC is the pho capital of the area and my work buddies have introduced me to a few places, which we like to call "dirty pho" and "clean pho," mostly because one is nasty and made me feel sick afterward and scared me off of pho for a while since it was my first pho experience and the other is bright and clean and delicious.  Don't let the first pho place I mentioned scare you--it was all about the location and no fault of the dish itself.  Pho is a Vietnamese soup that usually features beef, kinda like sliced brisket.  There's also chicken pho, the star of today's post.  I had the bright idea to make it at home since it's getting cooler and I had a half of a rotisserie chicken left in the fridge.  By Googling "rotisserie chicken pho" I found this recipe.  I altered it a little, particularly when it came to the five-spice powder.  I was being cheap because I'd already bought a bunch of strange new sauces like "fish sauce" and "hoisin sauce" that I wasn't sure I'd ever use again, and after reading the ingredient label on the powder I figured I could make my own.  That kinda worked, and by kinda I mean I had three of the five ingredients (star anise, cinnamon, cloves, fennel, and a funky pepper I can't pronounce).  Well, I had two, plus I added ground ginger, partially because I read it's sometimes used in five spice powder and partially because I feel guilty about buying spices and only using them once or twice (cardamom, I'm looking at you). 

Enough with the talking--let's make some pho!

Soak 4 ounces of rice sticks in water for 15 minutes and then rinse and drain.


In your big pot (or Dutch oven from your obscure Christmas gift list) heat 32 ounces of chicken broth, a bay leaf, a pinch of five spice powder (ahem!), and one tablespoon of fish sauce over medium heat.  Simmer for about five minutes.  Add shredded chicken (rotiserrie, leftover grilled, whatever form of chicken you have that already been cooked) until heated through, about five to ten more minutes.  I'm reading now that you're then supposed to add the drained rice sticks/noodles and simmer for 30 seconds until hot, but I think I missed this part.  I guess instead you could be like me and put your noodles in a bowl, then spoon the pho over the noodles.  Looks a little something like this:


Look at that cute little spoon that probably has a proper name!  I look like a fool eating noodles with it, but it's fun for the first few bites until I give up and get a fork to twirl the noodles and spear the chicken.  Reminds me of every single time I've attempted chopsticks.

You don't want naked pho, unless you're Adam, so here's my take on the traditional plate of toppings: cilantro, lime, and bean sprouts.  Don't forget the bottle of sriracha for some heat!


There you have it:  a hot bowl of pho that only takes about 20 minutes.  Pho sho!

Sunday, October 23, 2011

Autumn Trifle

I baked A LOT this weekend.  We were working a fall carnival at an elementary school and I needed some baked goods for that.  My pal Amy wanted to make a cake for her man Jay's birthday and I baked it ahead of time so we could decorate it Saturday afternoon.  I also needed something to take to a work Halloween party Saturday night.  On Friday I was sitting near a lady talking about her own school's carnival that is coming up and we swapped ideas.  She said that kids always choose the treat that has gummy worms on it.  I took her advice and made some worms in dirt cookies:


So appetizing!

As for Amy's cake...that's how I came up with the Autumn Trifle.  See, I tried to make the cake while cooking dinner on Friday night.  I may have misread the directions and I may have poured in a little too much water.  The cake may have fallen apart.  Nope, the cake definitely DID fall apart.  Since it's a shame to waste perfectly delicious marble cake I repurposed it for a trifle for Saturday night.  Into the container it went in crumbly little bits.


I ran to the store after all of my cookies were done (all 8 dozen or so!) to get another mix and baked another one before I went to bed.  This one was really attached to the pan and came out in sections.  I forced it all out of the pan by beating on it and then left it to cool on the counter and hopefully stick back together!

Amy wanted to make a pirate-themed cake and had picked up a bunch of fun decorations for it.  We had a good time putting it together and it turned out pretty cute.  We did the piping gel water trick from Heather and Bear's wedding cake and used brown sugar for the sand.  Arrrrrgh!


I like the "gold" around the treasure chest!  That was such a creative idea, Amy!

After the carnival was over and the castle cake off to its party, I put together the trifle.  Since I figured this is the one you might actually try to make, I took step-by-step pictures of the process so you'd know how to put together a trifle. 

****Funny trifle story tangent:  One Christmas my sister-in-law, my grandmother, and I all read about and made the same trifle.  Ha!****

Okay, back to the autumn trifle.  Here's the cast of characters:


First, bake a cake that falls apart.  If you're too good to mess up a cake, bake a good one and then break it off into 1 inch cubes.  Layer these in a trifle bowl (or a clear bowl will do).


Next, make some pudding.  I went with butterscotch (sugar-free...shhhh!).


Then, once it's set, you scoop half of it on top of the cake in the trifle bowl and spread it around to make your second layer.


Do the same thing with half of your Cool Whip (lite Cool Whip...shhhh!).


Then you do it all over again!  If you're making a different version with fewer of each ingredient and can squeeze in three whole sets of layers, go for it.


For the fininshing touch:  a sprinkling of candy corn!


There you have it:  a delicious autumn trifle.  Happy fall, y'all!


Friday, September 16, 2011

Pumpkin Pie Muffins

We're definitely on a healthy eating kick here at the Walker house.  Combine that with the record-setting summer of hundred degree-plus days and you'll get an Adi who hasn't been turning on the oven...until now!  Yesterday the heat finally gave way to cool breezes and highs in the 80s (and rain!).  I really missed getting creative in the kitchen with all of this non-baking and beginning of school craziness so tonight was the night to try out my newest cookbook, The Food You Crave by Ellie Krieger of Food Network fame.  In all honesty I never paid attention to her because she couldn't really hold a candle to Paula Deen and all of those glorious butter-filled recipes.  Sauteed vegetables or gooey butter cake?  Yeah, exactly.

I've marked a few recipes to try in this book that satisfied my old eating standards and my newer, healthier, less-processed ideas.  The first one I've tried is called "Pumpkin Pie Muffin."  Sounds like a good compromise to me!

If you'd like to try it for yourself, you can find the recipe here:
http://www.foodnetwork.com/recipes/ellie-krieger/pumpkin-muffins-recipe/index.html

It'll come out looking like these:


I did make a few changes (some on purpose and some, well, not so much!).  The accidental change was a whole 15oz can of pumpkin puree instead of just a cup. I also took this opportunity to use up some of the Babe's sorghum that Adam once brought me because he thought he remembered me eating it once and liking it (he was half right, but it was a sweet gesture).  I think these were changes for the better because I couldn't have imagined a better, moister muffin.  See for yourself:


Do you see how it retained its shape so well?  20 minutes was just right and none of them stuck to the muffin tin (except the one in the overflow tin that I forgot to spray...oops).  The recipe said it yields 12 muffins but she must be using a monster pan because my attempt made 18 generous muffins.  Delicious, healthy, moist, and pumpkiny...the perfect way to usher in Fall.