I'm new to balsamic vinegar. I mean, I've enjoyed it in restaurants, but I've never bought a bottle or cooked with it...until tonight! I'd just seen a cooking show featuring pasta cabonara but wanted to mix in the sweetness from the balsamic, so I gathered up a few ingredients that seemed compatible and began to play with my food.
-4 strips of leftover turkey bacon
-1 serving of whole-wheat thin spaghetti
-2 quick splashes of balsamic
-1/4 cup of diced tomato
-1 minced garlic clove
-a few spoonfuls of crumbled feta cheese
I boiled the pasta while I chopped and warmed the bacon, as well as diced the tomato and minced the garlic. When the pasta was cooked and drained I threw it in a bowl and added all of my prepped ingredients, plus a few drizzles of balsamic and some spoonfuls of feta. The taste came out pretty well, but I was surprised at how quickly the balsamic was absorbed into the pasta. I was afraid it would be in a puddle in the bottom of my bowl! I added maybe a teaspoon and a half of olive oil and stirred it in with some cracked black pepper and a quick crack of sea salt. Pretty nice pasta!
(Yes, that's edamame in the background. Just call it an international dinner. :)
The sweets, treats, and creations of a girl who never outgrew her imagination
Sunday, July 17, 2011
Friday, July 15, 2011
It's finished!
It's finally finished! I've been working on this cami for over a year (off and on, of course) and it's finally done!
It all started when I saw this pattern:
in this book:
The original pattern called for the same front and back pieces attached at the sides and straps. I didn't like that, so I made the back straight across (like this):
I also changed the flowers that were scattered over the front of the cami in the pattern. I wanted to learn to do a shell border, so thanks to an informative YouTube video by a very pleasant, patient-sounding woman (http://www.youtube.com/watch?v=glY3IRbk9Xw) I was able to add a scalloped edge.
I've worked on this thing for so long that I'm not sure which direction to go next. Sweater? Casserole carrier? Blankets? Hat? Hmmmm....
It all started when I saw this pattern:
in this book:
The original pattern called for the same front and back pieces attached at the sides and straps. I didn't like that, so I made the back straight across (like this):
I also changed the flowers that were scattered over the front of the cami in the pattern. I wanted to learn to do a shell border, so thanks to an informative YouTube video by a very pleasant, patient-sounding woman (http://www.youtube.com/watch?v=glY3IRbk9Xw) I was able to add a scalloped edge.
I've worked on this thing for so long that I'm not sure which direction to go next. Sweater? Casserole carrier? Blankets? Hat? Hmmmm....
Sunday, July 10, 2011
Patio Furniture
Every the thrifty gal, I decided that I could not justify spending $500 or more on the kind of patio furniture I kept eyeing. Inspiration struck when I was driving home with Adam one day. A neighbor a block over from us had a wooden table sitting out on the curb. I spoke to the man and we settled on $35 for the table and four chairs. They would need a little work, but I loved the idea of a farmhouse table-style setup on my back porch.
I consulted a few more-experienced woodworkers about my situation, and I went with the disassemble/sand/fill/sand/stain/reassemble/varnish method. My goal was to finish the table by the 4th of July. Here we go!
Time to put it all back together!
The table still has some cracks in it, despite the filler and attempts to repair it. By also sanding the underside of the table I was able to make the sides slide out much smoother than they did originally. (I added some new felt under there, too, so the underside of the table would stop scratching the top of the slide-out sides!)
The chairs, unfortunately, are not going to make it. There are major cracks along critical parts of the chair that make them not even worth refinishing.
I'm on the lookout for some more chairs that will go well with my black wood, which may mean that I'll need to make some deeper, larger cushions, since the chairs that are my current frontrunner are shaped differently than these. The ones I like the most are black, iron chairs with a cute, geometric flowery pattern. I'll post the whole set when I actually get something!
I consulted a few more-experienced woodworkers about my situation, and I went with the disassemble/sand/fill/sand/stain/reassemble/varnish method. My goal was to finish the table by the 4th of July. Here we go!
After sanding the table I realized that the original stain seeped so far down into the wood that no amount of sanding was going to completely erase the irregular areas of stain (and the nice man at Home Depot confirmed this when I described my dilemma to him). So, I took my original farmhouse table idea (you know, natural-color wood top with black legs) and decided to go all-ebony stain to cover up the patch areas.
Time to put it all back together!
The table still has some cracks in it, despite the filler and attempts to repair it. By also sanding the underside of the table I was able to make the sides slide out much smoother than they did originally. (I added some new felt under there, too, so the underside of the table would stop scratching the top of the slide-out sides!)
The chairs, unfortunately, are not going to make it. There are major cracks along critical parts of the chair that make them not even worth refinishing.
I'm on the lookout for some more chairs that will go well with my black wood, which may mean that I'll need to make some deeper, larger cushions, since the chairs that are my current frontrunner are shaped differently than these. The ones I like the most are black, iron chairs with a cute, geometric flowery pattern. I'll post the whole set when I actually get something!
Tuesday, July 5, 2011
Birthday Buddy
Adam's little cousin, Abbey, turned one year old today and I got to make the cake for her party! Her parents asked for a big cake in the shape of a "1" with a white background covered in red and blue fondant stars.
I used a big ol' pan (1/2 sheet cake) and carved the 1 out white cake. (It almost cracked in half when I had to flip it out of the pan onto the cooling racks! Note to self: find a bigger cooling rack!)
Next came the frosting and star border. Then I used homemade marshmallow fondant (the only kind to use!) that I dyed and cut out lots of small stars.
The finished product:
Of course, Abbey needed her own cake, too (which I heard she ate very daintily, by the way):
Happy birthday, Abbey! (Only the coolest people have birthdays on July 5th!)
I used a big ol' pan (1/2 sheet cake) and carved the 1 out white cake. (It almost cracked in half when I had to flip it out of the pan onto the cooling racks! Note to self: find a bigger cooling rack!)
Next came the frosting and star border. Then I used homemade marshmallow fondant (the only kind to use!) that I dyed and cut out lots of small stars.
Of course, Abbey needed her own cake, too (which I heard she ate very daintily, by the way):
Happy birthday, Abbey! (Only the coolest people have birthdays on July 5th!)
Friday, July 1, 2011
Flowers aplenty
We recently spent a week in Canada (or Canadia, as our group kept calling it). The temperature in the Victoria/Nanaimo region of British Columbia is so mild--60's to 70's are common for this time of year with some light rain and they don't dip too far below the 40s, even in the winter. Can you imagine?! It's a sweltering 103 here consistenly right now! The upside to these beautiful conditions is that the plants go nuts in such a lush environment. For this post, bear with me as I stretch the premise of sharing my creations on this blog by instead showing my view of God's creations through the artistry of my camera lens (a Nikon D60 for those of you wondering). Enjoy!
**All pictures are unedited.**
Pacific Shores Resort in Nanoose Bay
Milner Gardens in Nanaimo
Washington wildflowers (from Pike Street Market in Seattle)
**Bonus pictures: my favorites with Adam**
**All pictures are unedited.**
Pacific Shores Resort in Nanoose Bay
**Bonus pictures: my favorites with Adam**
Monday, June 20, 2011
60th Birthday Cake
A friend of mine from TWU recently asked me to make a cake for her mom's surprise 60th birthday party. Considering she was my first "customer" I'm always flattered when she asks. The theme was black, white, and red, and thankfully she only wanted white on the cake. (Her party planner and I agreed that it's bad when your guests are walking around with red and black cake dye all over their tongues and lips!) We traded a few designs and ideas and settled on a two-tier, wedding-style cake with a pearl theme. She wanted a bowl of pearls spilling out around the cake, fondant pearls around the base of each tier, and white pearls on an ivory background.
I made my usual buttercream frosting recipe with some ivory coloring. The bottom tier was vanilla (white cake), and the top tier was red velvet. I had enough red velvet left over to make a small, two-tier side cake in case she needed some emergency slices for unexpected guests. I made some yummy marshmallow fondant by hand for the pearls around the base and painted them with pearl dust to give them that pearly glow. At this point, the cake looks like this:
I had purchased a pretty glass dish (Libby glass, of course, for those of you who don't know my penchant for their stuff since my Louisiana days) for the pearls to spill out of and also picked up 10+ yards of stringed pearls from the craft store. I was concerned that the glass bowl would lose its balance on the top tier, and compared to the luster of the painted fondant pearls I thought the string of pearls looked kinda cheap. This is where I went into overachiever mode:
Yep, those are approximately 5.3 gazillion fondant pearls that I rolled for the cake. Of course, I still had the concern about the top-heaviness of the glass bowl, so I took it a step further and, in keeping with the ivory/white theme, made my own bowl:
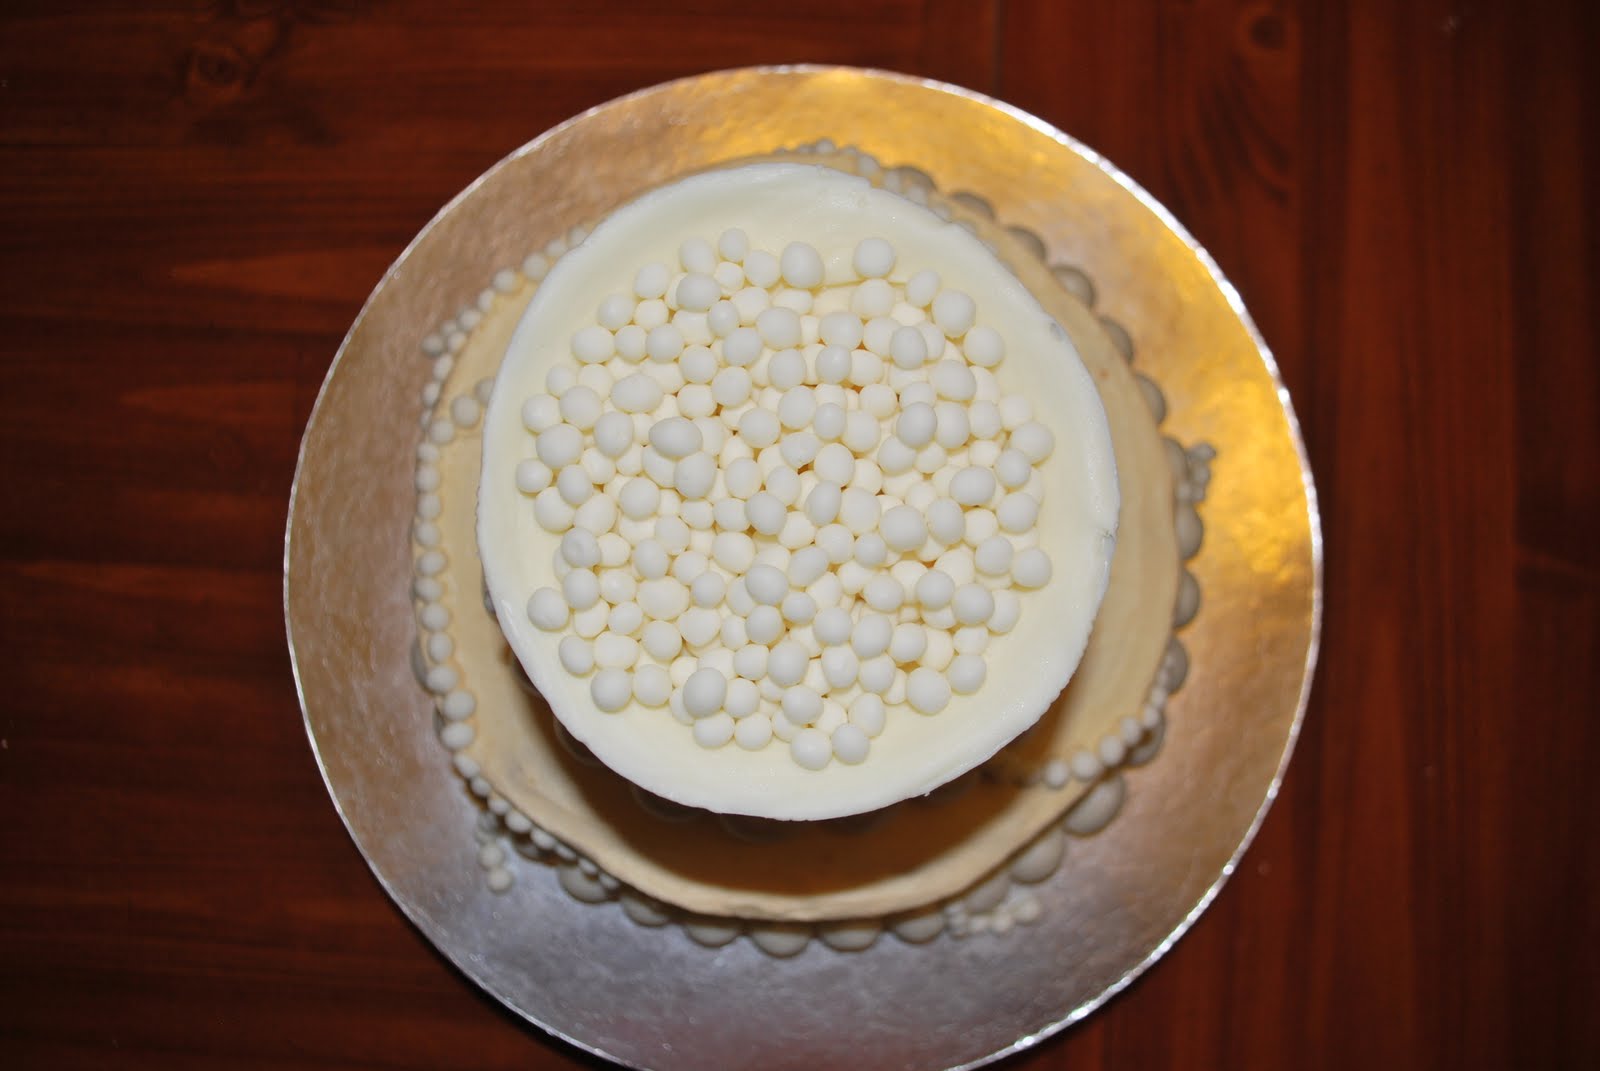
That is a bowl made of white chocolate, which matched the cake icing beautifully. I filled the bowl with the tiny pearls and made four strands of those tiny pearls cascading around the cake:
As usual, I critique the finished product to figure out where I've grown and where I need to improve. I am really happy to report that I sawed away at this cake's layers and avoided the lopsided-ness that was the castle cake of 2010. (Funny enough, I read an article the day I baked and trimmed the cakes that said that frugal people have the hardest time levelling cakes because they are scared they're wasting perfectly good food...I so connected with that and it helped my rationalize what I was doing wrong!). The area I'd like to improve upon is my icing smoothness and crumbiness (a real word, or at least it is now). I don't know if it was particularly hot in my kitchen that day but even my Viva towel smoothing tricks weren't working. I did the crumb coat but when I went to apply the final coat it rewetted the crumb coat and got crumbs in the final coat (especially red velvet, since it's dark red under a layer of white). The good news about this cake is that I am more in love with the finished product than the picture I had in my head, and it usually doesn't turn out that way. I'm so happy I took the time to make the tiny fondant balls and paint the big ones with the pearl dust. It made it look so pretty, and it's a great technique that really gets you a lot of "pop" on the cake.
I made my usual buttercream frosting recipe with some ivory coloring. The bottom tier was vanilla (white cake), and the top tier was red velvet. I had enough red velvet left over to make a small, two-tier side cake in case she needed some emergency slices for unexpected guests. I made some yummy marshmallow fondant by hand for the pearls around the base and painted them with pearl dust to give them that pearly glow. At this point, the cake looks like this:
I had purchased a pretty glass dish (Libby glass, of course, for those of you who don't know my penchant for their stuff since my Louisiana days) for the pearls to spill out of and also picked up 10+ yards of stringed pearls from the craft store. I was concerned that the glass bowl would lose its balance on the top tier, and compared to the luster of the painted fondant pearls I thought the string of pearls looked kinda cheap. This is where I went into overachiever mode:
Yep, those are approximately 5.3 gazillion fondant pearls that I rolled for the cake. Of course, I still had the concern about the top-heaviness of the glass bowl, so I took it a step further and, in keeping with the ivory/white theme, made my own bowl:
That is a bowl made of white chocolate, which matched the cake icing beautifully. I filled the bowl with the tiny pearls and made four strands of those tiny pearls cascading around the cake:
As usual, I critique the finished product to figure out where I've grown and where I need to improve. I am really happy to report that I sawed away at this cake's layers and avoided the lopsided-ness that was the castle cake of 2010. (Funny enough, I read an article the day I baked and trimmed the cakes that said that frugal people have the hardest time levelling cakes because they are scared they're wasting perfectly good food...I so connected with that and it helped my rationalize what I was doing wrong!). The area I'd like to improve upon is my icing smoothness and crumbiness (a real word, or at least it is now). I don't know if it was particularly hot in my kitchen that day but even my Viva towel smoothing tricks weren't working. I did the crumb coat but when I went to apply the final coat it rewetted the crumb coat and got crumbs in the final coat (especially red velvet, since it's dark red under a layer of white). The good news about this cake is that I am more in love with the finished product than the picture I had in my head, and it usually doesn't turn out that way. I'm so happy I took the time to make the tiny fondant balls and paint the big ones with the pearl dust. It made it look so pretty, and it's a great technique that really gets you a lot of "pop" on the cake.
Thursday, June 2, 2011
Getting there...
I've been working on crocheting a camisole for, oh, about a year now. I put it down because it was going soooo slowly and also because I got a little distracted by an intense semester of grad work and other projects. I recently picked it back up and added the tapered straps to the top and started on the back. I plan on taking it with me to work on during our long flight to Canada this summer. Maybe I'll finish it early enough in the trip to be able to wear it around on vacation!
Subscribe to:
Posts (Atom)